About
Convert your V-Ray scenes form sRGB to ACEScg and use The Academy Color Encoding System industry standard for managing color in your projects. With AColorManager you can also convert colors and bitmaps of your 3ds Max scenes from/to specified color profile or gamma value.
Contact Us:
EmailSubscription & Pricing
The new versions of AColorManager are available only with subscription plan for our AvizStudioTools – AIO application. You can try the app with a 15 day trial and evaluate the tool. There is also an old version of the tool that can be used for free, but this version does not include conversion to ACEScg.
The new AColorManager version, with support and free updates, is available only with subscription plan for AvizStudioTools – AIO application from the link below:
- Buy latest AColorManager – with subscription for AvizStudioTools – AIO
Download & Install
This script works with 3ds Max 7 or later. The Free version of this tool can be used for commercial and non-commercial projects. You are not allowed to sell or distribute any of the tools or the included files. We are not responsible for any damages or problems that may result by using this product.
New versions for 3ds Max 2018 or newer :
- AvizStudioTools_AColorManager – latest version
Old versions for 3ds Max 7 – 2017 :
How to install for 3ds Max 7 to 2017:
- Download, extract and install the your version.
- Restart 3ds Max.
- Create new UI Button or Shortcut to start the tool.
UI Buttons and Shortcuts:
- From 3ds Max menu, select: Customize > Customize User Interface… > in Keyboard or Toolbar tab select Group: Main UI and Category: AvizStudioTools. From the list below assign keyboard shortcut to AColorManager from Keyboard tab or from Toolbar tab drag and drop AColorManager to a toolbar to create UI button for the script.
Interface
Convert to ACEScg (V-Ray) Mode
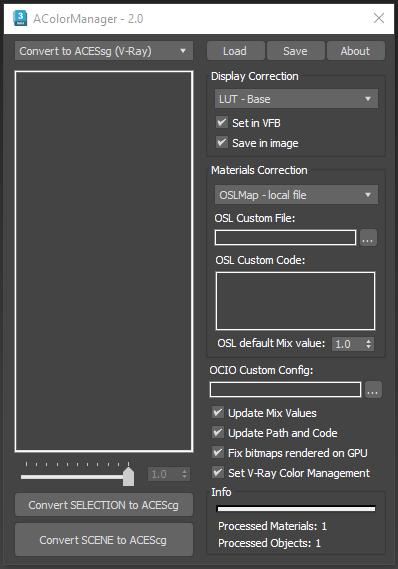
Materials and Maps list – In the list on the left you can select maps converted with the tool and then modify the Mix value for the selected with the slider below. To populate the list select objects in the scene and press Convert SELECTION to ACEScg button.
Mix slider – use the slider below Materials and Maps list to set the Mix value for the selected maps.
Mix spinner – enter custom float Mix value for the selected maps.
Convert SELECTION to ACEScg button – use this button to convert selected objects.
Convert Scene to ACEScg button – use this button to convert current 3ds Max scene.
LUT – OCIO dropdown – select the display correction in V-Ray Frame Buffer.
Set in VFB– when checked, all changes made in this group are set immediately in VFB.
Save in image– when checked, selected LUT is baked in to the image in VFB.
Map Type dropdown – select what map to use for the conversion. Only OSL maps have MIX parameter.
OSL Custom File – enter or select custom OSL file path.
OSL Custom Code – enter custom OSL code for the converted maps.
OSL default MIX value – enter default MIX value for the OSL maps.
OCIO Custom Config – enter or select custom OCIO config file path.
Update Mix Values checkbox – when checked, all existing OSL maps will be updated with the new default MIX value.
Update Path and Code – when checked, all existing OSL maps will be updated with currently set custom OSL path and code.
Fix bitmaps rendered on GPU – when checked, a workaround for known bug when rendering with V-Ray on GPU.
Set V-Ray Color Management – when checked, the tool will set the correct Color Management options in the V-Ray render settings dialog.
Info group – shows info about last conversion.
Profile Mode
[Profile] button – press to select profile mode
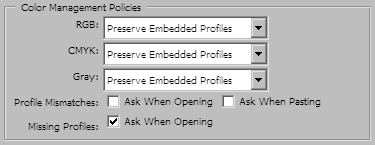
Convert With Photoshop – Convert color profile using Adobe Photoshop (should be installed in your system). It’s recommended to set Photoshop Color Management Policies as follows:
Options Photoshop – First three options are the same as options in Photoshop preferences.
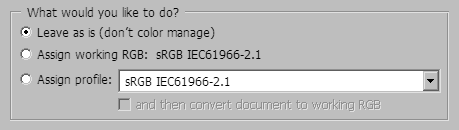
Assign Profile Only if Missing* – Assign profile only if image has no color profile information. For this option to work correctly set Photoshop Color Management Policies, as shown above. Open any image without color profile and when dialog ask you for missing profile – select “Leave as is”:
Convert With ImageMagick – Convert color profile using ImageMagick (should be installed in your system).
Options ImageMagick – Option to remove embedded profile of image file before assigning or converting file.
Convert With Custom Application – Convert with other custom application that support command line interface.
Options Custom Application – Option to set and edit command string.
[System Profiles] button – Read profiles installed in the system and load the names of the profiles in drop-down menus below.
[Folder Profiles] button – Read profiles from custom folder and load the names of the profiles in drop-down menus below.
Assign Profiles Checkbox – Select to assign profile to colors.
Assign Profiles Dropdown Menu – select which profile to assign.
Assign Profiles Text Field – Enter the name of the profile for Photoshop or select a file for ImageMagick and custom application. Delete field to access the drop-down menu above.
Convert To Profiles Checkbox – Select to convert colors to profile.
Convert To Profiles Dropdown Menu – select to which profile to convert.
Convert To Profiles Text Field – Enter the name of the profile for Photoshop or select a file for ImageMagick and custom application. Delete field to access the drop-down menu above.
Gamma Mode
System Gamma Preferences – Show current system preferences settings.
Set New System Values – Set system gamma values for display, input and output. To set new values press [Set] button.
Convert From Gamma – Set gamma value of current colors and bitmaps.
Convert To Gamma – Set new gamma value.
Only Excl. Bitmaps – Inverse – Convert only bitmaps that match the exclude patterns with inverse from/to gamma.
Save New Bitmap Files As – Select the file type converted bitmaps.
New Files Options
New Files To Folder Checkbox – Select to place converted files to folder.
Add Suffix To New File Name Checkbox – Select to add suffix entered below.
Buttons
[Convert File] button – Convert single file.
[Convert Colors] button – Convert up to 10 custom colors.
[Convert SCENE/SELECTION To Profile/Gamma] button – Convert scene or selection of objects.
[Load] button – Load saved settings from file.
[Save] button – Save current settings to text file.
[About] button – About this script, register license key (Pro version only).
Filters
Convert Scene – Selection – Select to convert entire scene or selection of objects.
Convert Bitmaps – Select to convert bitmaps.
Convert Colors – Select to convert colors.
Search Objects – Search objects for bitmaps/colors (for example color of light object).
Search Materials – Search scene materials for bitmaps/colors.
Search Modifiers – Search modifiers for bitmaps/colors (for example displace modifier).
Search Mat. Editor – Search material editor for bitmaps/colors.
Search Wire Color* – Convert objects wirecolor (this parameter is not affected by patterns below).
Search Environment* – Convert environment colors – background and global lighting colors (this parameter is not affected by patterns below).
Include Patterns Path – If this option is enabled, every pattern from the list below will be tested against every step of the path to the current color or bitmap. If this option is disabled, only the name of the color or bitmap field will be tested against pattern list.
Include Patterns – Include list of text patterns (read more for “Paths And Patterns” below). If a match is found the value will be converted. Delete all patterns to include all colors and bitmaps.
Exclude Patterns Path – If this option is enabled, every pattern from the list below will be tested against every step of the path to the current color or bitmap. If this option is disabled only the name of the color or bitmap field will be tested against pattern list.
Exclude Patterns – Exclude list of text patterns (read more for “Paths And Patterns” below). If a match is found the value will not be converted.
Info – Show progress and information for last conversion.
Path And Patterns
Matching patterns and the path to the colors or bitmap files are powerful ways to select only the parameters that you want to convert.
The Path is an array of names that represents the steps from the class of the parent object to the name of the target color or bitmap:
[Class of parent object] , [step1] , [step3] , [step…N] , [Name of Color or Bitmap field]
Path examples:
1. A standard 3ds Max material with Checker Map in diffuseMap slot and Gradient Map in map1 slot of the Checker Map has path to color1 in Gradient Map as follows:
[Standardmaterial] , [diffuseMap] , [map1] , [color1]
2. The RGB color of Omni light has path:
[Omnilight] , [rgb]
3. The path to the texture map in a VRayDisplacementMod modifier is:
[VRayDisplacementMod] , [texmap]
You can see the different steps of the path by enabling MacroRecord in MAXScript Listener window and changing the value you want to convert (to see the result, drag down the line at the top of the white field in the Listener window). For “Path example 1” the result of changing color 1 in gradient map will be:
meditMaterials[1].diffuseMap.map1.color1 = color 128 128 128
The Patterns is a list of wild-card names to match against path steps of a color or a bitmap values. They may or may not have special characters like “*” or “?”:
1. A pattern “color” will return true for every tested value from a path array that is equal to “color”.
2. A pattern “color?” will return true for every tested value from a path array that begin with “color” and after that has one more character. For example: “color1”, “color2″,”colorA”.
3. A pattern “color*” will return true for every tested value from a path array that begin with “color”. For example: “color1”, “color_top”,”color_diff”.
Tips & Shortcuts
Patterns [+] button – Press Ctrl + plus button to load default patterns list or press Alt + plus button to save current patterns list as text file.
Patterns [-] button – Press Shift + minus button to delete all patterns in the list below.