About
The basic version of the plugin, available at no cost, enables the generation of diverse objects with reproducible geometry through the specification of a tile shape and offset between tiles. Additionally, users have the flexibility to specify tile count, and the plugin will distribute them evenly based on the entered dimensions. The ATiles object’s parameters offer further customization options, such as defining tilt angles (particularly useful for roof tiles), region constraints, additional configurable settings.
Contact Us:
EmailATiles Pro & Subscription
With the release of version 3.0, the ATiles plugin is exclusively accessible through subscription within our AIO application. Users can install and load version 3.0 or later on any machine, allowing them to load and render previously created scenes even if their subscription has expired. However, under such circumstances, the ability to create new objects or modify existing ones will be restricted. Within the setup dialog of our AIO app, users can seamlessly switch between 2.x and 3.x versions for different projects. For those who have purchased product versions 1.x or 2.x, continued use of the latest ATiles v2.x is possible by loading the old version and entering the product key in the “About” rollout of any ATiles object.
The Pro and Subscription versions include all basic features and offer additional capabilities, including:
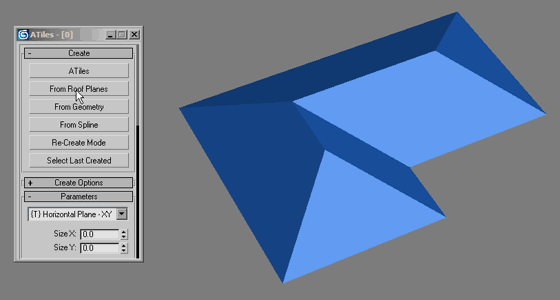
- One-click creation of ATiles objects from roof planes, geometry, or splines.
- Mesh caching for enhanced speed, storing generated geometry within the ATiles object.
- Re-create mode, allowing the rebuilding/updating of objects with one mouse click.
- Advanced tools such as Volume, Path, and Surface tools.
- Random transformations of tiles, including Rotate, Move, and Scale.
Pricing
ATiles for 3ds Max 2018 or newer
The latest versions, with product support and free updates, will be available only with subscription plan for AvizStudioTools – AIO Application from the link below:
You can first try all our latest tools including ATiles Pro, with Free 15 Day Trial!
Download & Install
The script is compatible with 3ds Max 7 or later. The free 2.x version is suitable for both commercial and non-commercial projects. However, selling or distributing the tools and included files is prohibited. Any damages or issues arising from the use of this product are not our responsibility.
New versions for 3ds Max 2018 or newer:
Install the latest versions 2.x and 3.x exclusively through the AvizStudioTools – AIO Application:
Old versions for 3ds Max 7 – 2017 :
- AvizStudioTools_ATiles_v2.61.zip
- AvizStudioTools_ATiles_v2.60.zip
- AvizStudioTools_ATiles_v2.52.zip
- AvizStudioTools_ATiles_v2.51.zip
- AvizStudioTools_ATiles_v2.50.zip
- AvizStudioTools_ATiles_v2.02.zip
- AvizStudioTools_ATiles_v2.01.zip
- AvizStudioTools_ATiles_v2.0.zip
- AvizStudioTools_ATiles_v1.4.zip
- AvizStudioTools_ATiles_v1.3.zip
- AvizStudioTools_ATiles_v1.2.zip
- AvizStudioTools_ATiles_v1.1.zip
- AvizStudioTools_ATiles_v1.0.zip
UI Buttons and Shortcuts:
To assign a keyboard shortcut or toolbar button for the ATiles ToolBox, navigate to the 3ds Max menu and choose: Customize > Customize User Interface… In the “Keyboard” or “Toolbar” tab, select Group: Main UI and Category: AvizStudioTools. Assign a keyboard shortcut to “ATiles Tool” in the “Keyboard” tab or, in the “Toolbar” tab, drag and drop “ATiles Tool” to a new or existing toolbar to create a UI button.
Interface
Parameters
{T} Y, XY, XZ – Set the type of the ATiles object – Straight Line, Horizontal Plane or Vertical Plane.
Size X,Y,Z – Set the size of the ATiles object for local X,Y or Z. When set to zero, script use corresponding “Count” and “Offset” values to calculates the object’s size.
Count X,Y,Z – Set the count of the elements in the ATiles object for X, Y or Z. When set to zero script bypasses this value and use corresponding “Size” and “Offset”. If type of the ATiles object is XY or XZ and “Count Y” or “Count Z” is set greater then zero, script will not ask user for third point when creating new object.
[Fit] Buttons – Fit tiles in the size of the object. Corresponding count should be more then one. (New in version 2.0)
Offset X,Y,Z – Set the offset of the elements in the ATiles object for X, Y or Z.
Offset R – Set the offset for every even row. (New in version 1.2)
[Abs] Buttons – Set absolute offset of the elements in the ATiles object ON and OFF . When ON, corresponding offset is exact distance between elements. When OFF, offset is percent of the element’s size. (New in version 1.1)
Tilt Angle – Set local rotation by X axis of the elements in the ATiles object.
Cut Start – Set the angle of cutting plane starting from first point of ATiles object. On/Off check box.
Cut End – Set the angle of cutting plane starting from second point of ATiles object. On/Off check box.
Cut Top – Set the angle of cutting plane at the top of ATiles object. On/Off check box. (New in version 2.0)
Cut Base – Set the angle of cutting plane at the base of ATiles object. On/Off check box. (New in version 2.0)
[Add New…] [R] [U] [X] Buttons -Add, Redefine, Update and Delete custom tiles. Script stores only the name of the picked object. If you rename or delete the original object in the scene ATiles update button will not work. (New in version 2.0)
{M} Main Drop-down – Select main tile for the object. (New in version 2.0)
{F} First Row Drop-down – Select first row tile type for the object. (New in version 2.0)
{V} Viewport Drop-down – Select tile to be shown only in the viewport. (New in version 2.0)
Auto Align Custom Tiles – When ON, script applies auto align function to custom tiles. When OFF, script uses pivot point of the original object.
Advanced Parameters
Max Count – Set the maximum tiled elements in the object. Use it to limit the script to create too big objects that may exceed Max Script memory or crash the program.
Cut Offset – Set the offset of the cutting planes.
Opt. Create – Set maximum face count after which script will temporary replace sub elements with selected optimized tile below when creating or modifying object.
To disable this option set high value. (New in version 1.4)
{O} Optimized Drop-down – Select the tile to be shown in the viewport when creating or modifying objects. (New in version 2.0)
Cache Mesh For Speed – Store viewport and render meshes into the object to reduce unnecessary rebuilds of the object. Improve general speed and open file speed. Increase file size. (New in version 2.0)
Scale – Element – Set the scale of the chosen element in the object. When set to 1.0 the element is the same as the original, when set to 0.5 the element is half the size of the original, when set to 2.0 the element is twice bigger than the original and so on.
Scale – Offset – Set the scale of the offset values in the object. When set to 1.0 offset values are the same as shown in dialog box, when set to 0.5 offset values are 50% of the original, when set to 2.0 offset values are 200% of the original and so on.
Scale – Local X,Y,Z – Set the internal scale of the sub elements for X, Y and Z. (New in version 1.4)
Align – Rotate X,Y,Z – Rotate tiles to specified angle for X, Y and Z. (New in version 2.0)
Align – Offset X,Y,Z – Move tiles to specified offset for X, Y and Z. (New in version 2.0)
Align – Mirror XY,YZ,ZX – Mirror tiles across selected plane. (New in version 2.0)
[Reset] Button – Reset to default value Advance Parameters settings. (New in version 1.2)
Advanced Tools
[ToolBox] Button – Start new floating window in which user can control all preferences of ATiles object for selection of one or multiple objects.
Advanced Tools – Region – Define region to interact with the ATiles object. Use [Pick Region…] button to pick custom shape from the scene. With [X] button user can delete selected custom shape and with [U] button user can update selected custom shape. The script stores only the name of the chosen shape. If you rename or delete original object in the scene, update button will not work. The script uses standard Boolean operations with the defined region – Subtract and, Intersect. Select None to ignore the region.
Advanced Tools – Volume – Same as region but instead of shape you can define closed mesh as volume. (New in version 2.0)
Advanced Tools – Path (beta) – Define path for the object. Still in beta. (New in version 2.0)
Advanced Tools – Surface (beta) – Define surface for the object. Still in beta. (New in version 2.0)
Path/Surface Options: Align – Set custom point of alignment for Path and Surface Tools. (New in version 2.0)
Path/Surface Options: Align Point X,Y,Z – Use to shift the point of alignment. When X=0, Y=0, Z=0 the align point is the closest point to origin and when X=100, Y=100, Z=100 is the farthest point. (New in version 2.0)
Variations
Random Material ID – Apply random material ID for each tile form- to value. If “Only For ID” object is selected script will randomize only ID of faces with specified ID number. (New in version 2.0)
Random Transforms – Random transformations of the tiles – Rotate, Move and Scale.
Trans. Center X, Y, Z – define the center of the transformation, where X=0, Y=0, Z=0 is closet point to origin and X=100, Y=100, Z=100 is the farthest point. (New in version 2.0)
About
About This Object – Statistic about used tiles count, face count and time it took to build this object. Tiles count show how many tiles were used to create this object and in most cases is greater and not equal to the count of the tiles you see in the viewport.
Tips & Shortcuts
Control the tilt angle when creating ATiles object – Turn on 3D snap. While picking third point hold ALT to automatically change the tilt angle base on the snapping point, hold SHIFT if you want the tilt angle to be set to zero. Make sure Count Y or Z is set to zero, otherwise script will not ask user for third point.
Reset All – Hold SHIFT and press [Reset] button in Advanced Parameters to reset all parameters of the ATiles object to default values.